Gluten-Free/Lactose-Free Crackers

Besides being gluten-intolerant, my husband is sensitive to lactose, too. He can have cheese and butter but needs to take pills to totally enjoy them. He also likes to have some snacks on hand when he braves the Los Angeles traffic coming home as his hunger pangs tell him that traffic is putting his evening meal way off schedule AGAIN!

Most cracker recipes have butter or wheat in them. It took me awhile to come up with something that would stay the onset of starvation on the long drive home but wouldn’t incite digestive problems. I finally came up with the following recipe which has protein, fiber, vitamins, no baking powder, and the right kinds of fat.

Homemade Crackers

3 1/2 cups of gluten-free flour blend (I like Pamela’s Gluten-Free Artisan Blend)
5 tablespoons nutritional yeast (My favorite is Bragg – in imparts a mild cheesy flavor)
1 teaspoon salt
1/2 teaspoon freshly ground black pepper
1/4 cup Hemp Hearts*
1/4 cup ground flax seeds
2 eggs
3 tablespoons coconut oil or ghee*
4 teaspoons fresh lemon juice (or 2 water/2 lemon juice)

Combine all the dry ingredients in a mixing bowl.

Combine the coconut oil (or ghee) with the juice and the eggs and mix well.

Combine the wet ingredients with the dry ingredients and gently mix until a workable dough forms. The weather seems to play a huge part so, if necessary, add bits of water or juice along with teaspoons of ghee or coconut oil until the right consistency is reached.

Preheat oven to 350 degrees.

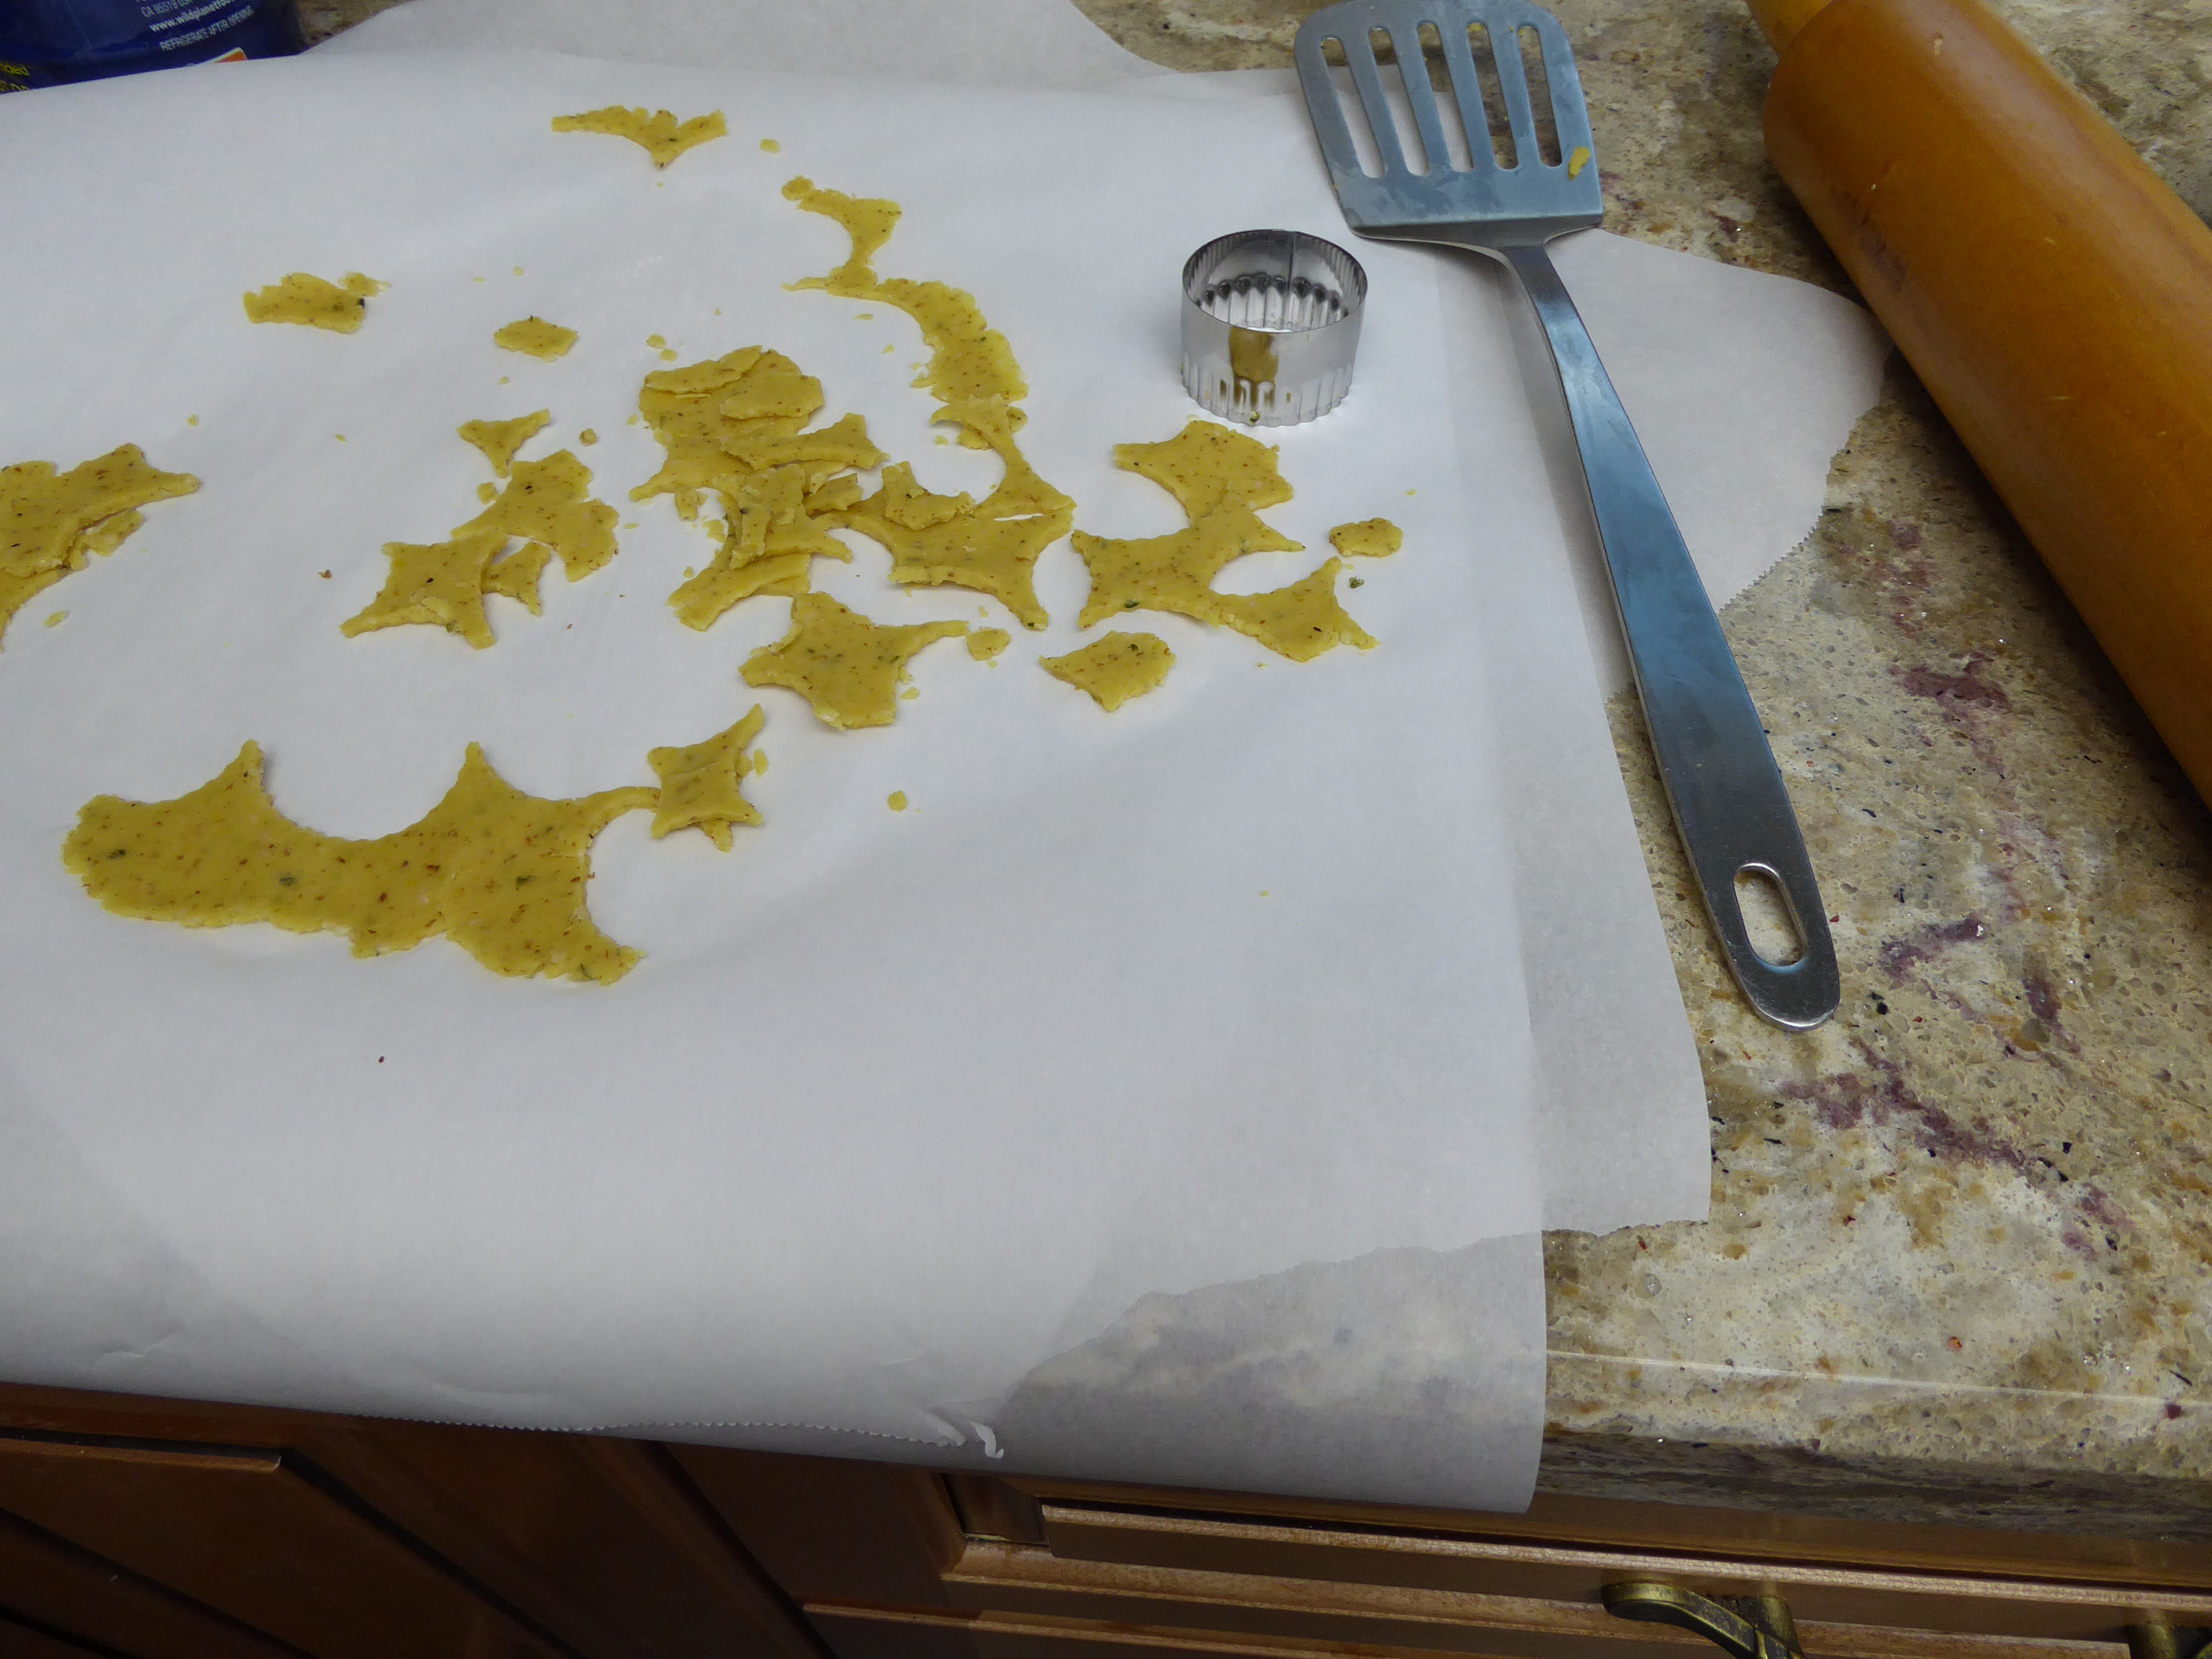
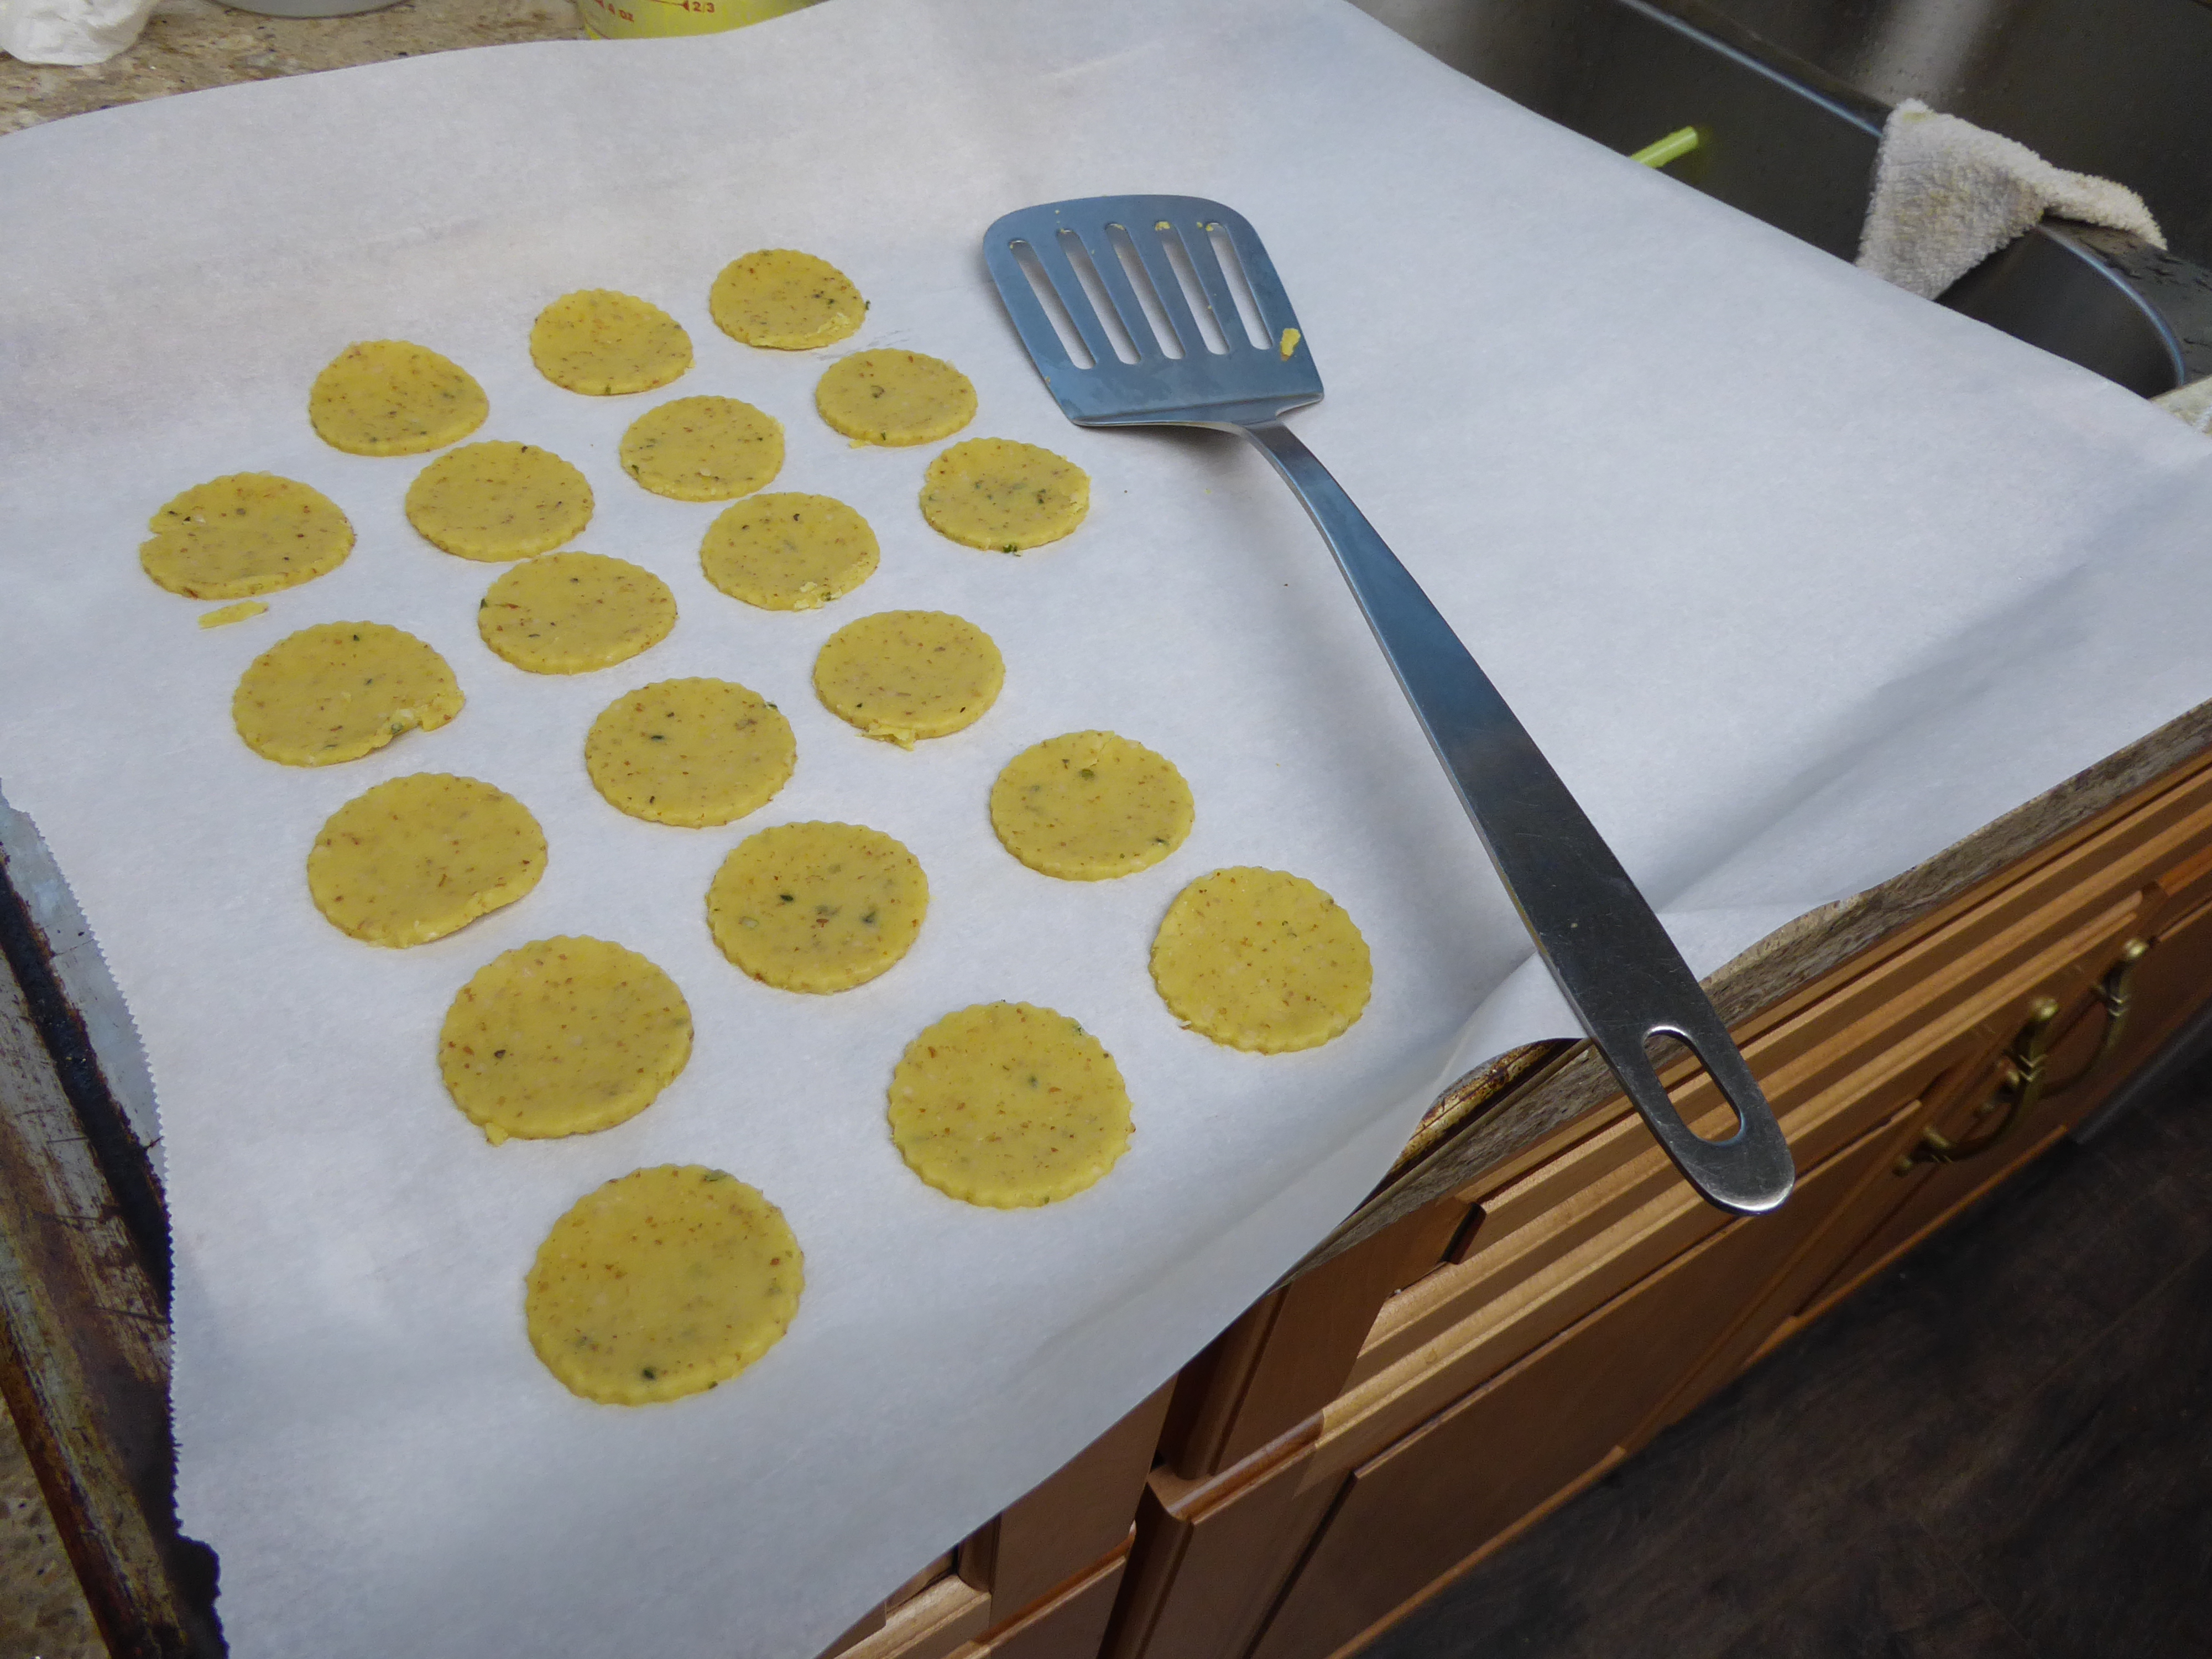
To save time and mess, divide the dough into fourths. Roll out one fourth between two sheets of parchment paper until about an 1/8th inch thick. Using a small round cookie cutter, cut out the crackers and place them on a parchment-lined baking sheet about a quarter of an inch apart. Bake for approximately 10-15 minutes or until golden. Remove to a cooling rack, wait a few minutes, and try one!

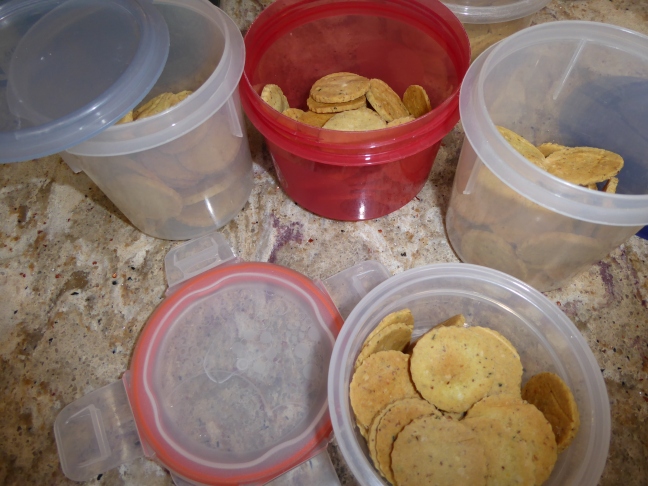
Store in a tightly lidded container. I usually divide the cooled crackers into three or four containers: One for easy snacking and the other ones in the freezer to keep fresh.

*Ghee is merely the solids removed from butter. I make mine my putting two sticks of butter in a large, glass measuring cup and gently melting them in the microwave. Once the butter is completely melted, let set until it separates and then carefully pour off the clear part into a small container being careful to avoid getting any of the cloudy residue into it.

*Hemp Hearts are at Costco and they have the best price I have found. They have a mild, nutty flavor.

Treat Yourself to a Piece of History

The sweet tooth of the world can be traced back around 4,000 years, however, the most popular delicacy of all time did not appear until the time of the ancient Aztec and Mayan cultures.
600 A.D. the Mayans migrated into the northern regions of South America. The earliest known cocoa plantations were established in the Yucatan. Both Mayans and Aztecs used the beans from the cacao tree and made a drink they called xocoatl. Aztec legends say the cacao seeds had come from Paradise and people who partook of the seeds gained wisdom.

Ancient Mexicans worshiped Tonacetecutli, the goddess of food, and Calchiuhtlucue, the goddess of water. The believed the two goddesses were the guardians of cocoa. With that in mind, each year, human sacrifices were performed to the goddesses. Part of the victim’s last meal?? Cocoa!
In the 1700’s, Swedish naturalist, Carolus Linnaeus, renamed ‘cocoa’ to ‘theobroma’ which is Greek for ‘food of the gods’.

It is purported that cacao beans were brought back to the court of King Ferdinand by Christopher Columbus from his fourth visit to the New World. Given the sparse information to this possible fact, the cacao beans were probably overlooked midst the many other treasures found that trip.

In 1519, Hernando Cortez visited the court of Montezuma. According to historian William Hickling’s History of the Conquest of Mexico (1838), Montezuma drank no other beverage but chocolatl. The general ‘recipe’ for chocolatl was a paste of the cacao bean, flavored with spices and vanilla which was reduced to a thick froth which gradually dissolved in the mouth. The drink was served cold.
Cortez brought chocolate back to the royal court of Kind Charles V in 1529. The cacao beans were secretly processed in the monasteries and chocolate was kept a secret for almost one hundred years. Italian traveler, Antonio Carletti, discovered chocolate in 1606 and it began its journey into other parts of Europe.

The first chocolate house is said to have opened in London around 1657 by a Frenchman. Being expensive, it was considered a drink for the elite. A quote from sixteenth-century Spanish historian, Oviedo, stated, “None but the rich and noble could afford to drink chocolatl as it was literally drinking money.”
Chocolate was also considered of medicinal value. Cardinal Richelieu dosed his various illnesses with it.

By 1730, the price of chocolate had dropped from approximately three dollars a pound to a cost that made it accessible to classes other than the extremely wealthy. In 1828, the invention of the cocoa press cut prices further and improved the quality of the end product. The Industrial Revolution furthered the popularity of chocolate.

Americans were introduced to chocolate at Prince Albert’s Exposition in 1851. John Hanan brought cacao beans to Dorchester, Massachusetts in 1765. The first chocolate factory was established there. For many centuries, chocolate was considered only a beverage. Actually eating chocolate began in 1674 in the from of cakes and pastries. With the use of a steam engine for grinding cacao beans in 1795, Joseph Fry of Bristol, English, was able to manufacture chocolate on a large scale. In 1847, Fry & Sons sold “Chocolat Delicieux a Manger” which is believed to be the first chocolate bar for eating. Nestle states that from 1800 to the present, four factors contributed to chocolate’s coming of age as a food product:

1. Introduction of cocoa powder in 1828
2. Reduction of excise duties
3. Improvements in transportation facilities, from plantation to factory.
4. The invention of eating chocolate.

Naturally from the 1800’s on, chocolate has continued to change and grow. The quick candy bar you grab for a snack today is a lot different from what was available one hundred years ago. The next time you let a delicious piece of chocolate melt in your mouth, don’t feel guilty about the calories because you are experiencing history! With that fact firmly in place, take advantage of the availability of chocolate today and try the following hot chocolate recipe and think ahead about gifts for your friends the next holiday season.

Hot Chocolate Mix in a Jar

11 cups of powdered dry milk
2 cups of powdered sugar
11 oz. powdered non-dairy creamer
2 lbs of instant chocolate drink mix
4 heaping tbsp. of unsweetened cocoa
1 small box of instant chocolate pudding mix
2 bags Mini marshmallows
6 qt. size mason jars

Blend the powdered milk in a food processor until finely ground. (Better for dissolving in the mug.) Mix all ingredients except marshmallows. Layer 6 tbsp of mix followed by a good handful of marshmallows until the jar is full, ending with the mix. Makes 6 one quart jars of hot chocolate mix. To make a cup of delicious hot chocolate, add 3-4 tablespoons of mix to six ounces of hot water.

Strawberry Fluff

Strawberries have made their annual appearance in the stores and in our gardens. Time to made use of the bounty and surprise our family with a cool yet tasty dessert.

Strawberry Fluff

1 package (10 ounces) frozen sliced strawberries, thawed
1 cup boiling water
1 package (3 ounces) strawberry flavored gelatin
1 cup chilled whipping cream
1/4 cup sour cream*
1 teaspoon vanilla extract

Drain strawberries, reserving syrup. Pour boiling water over gelatin in a bowl. Stir gelatin until it is dissolved. Add enough cold water to reserved syrup to measure one cup. Stir into dissolved gelatin. Chill until almost set.

In chilled bowl, beat cream, sour cream, and vanilla until stiff. Beat gelatin until it is foamy. Fold gelatin and strawberries into whipped cream. Pour into a one-quart mold or into individual molds. Chill until firm Garnish, if desired, with sweetened whipped cream.

*Sour cream is a great stabilizer for homemade whipped cream. It helps keep the whipped cream from breaking down and lasts in the refrigerator a couple of days. It also add a nice flavor to the whole dessert.

A Few of My Favorite Things . . .

Providing a gluten-free diet for my husband keeps me busying trying to find really good substitutes for basic things . . . like pasta. For soups, I make my own egg noodles and use either Better Batter ‘flour’ blend or Authentic Foods Steve’s Bread Flour to make them. There are those moments, however, when I long for the times that using packaged pasta required only as much extra effort as it took to walk to the pantry.

Two of our favorite comfort foods around here are Pad Thai and spaghetti with extra meaty sauce. We’ve tried a variety of gluten-free options for the spaghetti and the results were just okay. Recently, however, I noticed that my favorite pasta brand from the pre-gluten-free days also had a gluten-free pasta. I was game for another go in my explorations into the gluten-free world and finally discovered one that is pretty good. It tastes like regular pasta, had a nice ‘chew’ and doesn’t get soggy if you save a serving for the next day. My current gluten-free option of choice is Barilla!

We also love homemade Pad Thai which uses Asian Rice noodles. There is a world of difference between the various brands so we have been trying and hoping to find the perfect one for us. The one we are using now is a product of Thailand, labeled ‘Rice Stick’, made by Sun Voi and comes in three or four different widths for whatever recipes you might want them. Our market of choice for purchasing these for a very reasonable price is the 99 Ranch Market which is a huge Asian market with just about every obscure ingredient you might want or need for a recipe. They also have a great bakery, too, as well as a large fresh produce section.

Coconut Cream and Fruit!

My husband is lactose intolerant yet wants to enjoy the fruits of the season presented in a cold and creamy context. With some apprehension, we tried coconut cream and discovered a new family favorite. Basically, you refrigerate two or three cans of coconut cream (Thai Kitchen or Trader Joe’s are the ones we like best)over night.

There are all sorts of ways to prepare the fruit for the dessert. Sometimes, I saute some some peeled and diced apples with cinnamon and a bit of sugar until softened. Strawberries, fresh or cooked down with some sugar and orange juice works wells, too. Blueberries, pineapples … The nice thing about coconut cream is that it won’t curdle like milk so fruits with acidity won’t change the texture. In a hurry, use a favorite fruit preserve or jam.

For the recipe pictured, I pureed fresh strawberries with some coconut palm sugar (lower glycemic reaction) and a touch of nutmeg and some finely grated orange zest.

For preparing the coconut cream, drain the clean liquid from the can and place the thick, white coconut cream in a mixing bowl. Add a teaspoon or two of coconut palm sugar or go whole hog and use granulated sugar to taste along with a bit of nutmeg, teaspoon of vanilla extract, and dash of nutmeg. Whip up to smooth and fluff it up. Now, you can either alternate layers of fruit and coconut cream or fold in pureed strawberries into the coconut cream, top with a nicely-slice strawberry, refrigerate a couple of hours and serve.

This is very much a ‘to taste’ sort of recipe. We don’t use granulated sugar so enjoy a less sweet result. No problem, however, using regular sugar.

I made a dozen of these desserts for Thanksgiving and found the best and most fun way to store them in the refrigerator was to put the dessert in 8-ounce Mason jars complete with the lid.

Summer is Here!

During a shopping trip, yesterday, I discovered a sale on fresh strawberries. Up until now, strawberries were available (Hey! We live in California, the state of basically one season!)but either forced ripening or early harvesting left them tasteless and sour. The first reason these strawberries got my attention is that I smelled their summer smell before I even found them in the produce section. A dollar a pound for big, red strawberries was too good a deal to pass up and I was getting tired eating last year’s apples being processed through the stores.

Minutes after they were added to my grocery cart, my daughter came along and said, “Mom! Guess what!” I pointed to the strawberries and she was happy I felt the same way she did about the find.

Now, fresh strawberries don’t last too long if not eaten soon after bringing them home. I decided my husband needed his favorite dessert after having had to work on Saturday and at two different work sites in the space of a day.

Being gluten and lactose intolerant, I had long ago devised a recipe that was quick, in line with his dietary needs, and actually tasty. Ingredients? Fresh, cleaned strawberries and two cans of coconut cream. I prefer (in the order stated) Thai Kitchen or Trader Joe’s brand. We avoid sugar as much as possible but have found that Palm Coconut Sugar is easy on the glycemic count and you need very little to provide a touch of sweetness. Freshly-squeezed orange juice, grated zest, a tiny sprinkle of cayenne and some nutmeg work well.

First, half the strawberries are blended with the coconut cream, orange zest to taste, juice of half an orange, 1/2 teaspoon Palm Coconut sugar, a teaspoons of vanilla and the cayenne and nutmeg. The other half of the cleaned strawberries are thinly sliced or roughly chopped, your choice and dosed with juice of half an orange and 1/2 teaspoon of Palm Coconut Sugar. Now, layer them in small, pretty glasses or containers. Let them refrigerate for two or three hours and serve. My husband found it a great way to finish off dinner after a long day of work and fighting traffic.

Greens For Dinner!

A favorite at our house is sauteed fresh spinach with red onion and bacon. And it is so convenient that it comes bagged and ready to use . . . maybe. Yes, most fresh spinach products claim to be freshly-washed but I never feel it is freshly-washed up to my expectations!

I’m making spinach this evening and decided to show you what you can  expect if you don’t wash and soak your spinach.

First of all, always clean twice as much spinach as you think you will need as it cooks down drastically. My cleaning method is to put it into a very large bowl, fill the bowl with water to cover the spinach leaves and then pour in a half cup to a whole cup of cider vinegar depending on how much I’m making for dinner. I stir it around a bit and let it sit for 15 or 20 minutes while I work on other dinner prep. When I’m ready for the spinach, I put a colander in the sink and put in several handfuls of spinach into it, rinse, and place on a triple layer of paper towels, usually about four ‘sections’ of paper towel long. I continue this way until I have rinsed off all the spinach. Now, look at the water left in your soaking bowl. Doesn’t look too great, does it?


Salad Bites?

Vegetable Soup was simmering on the stove and cheese bread was baking in the oven. It seemed that the meal needed something a bit more to satisfy a hungry husband who would have had to fight the Friday night traffic coming home from work and a daughter who is always nibbling.

Then, I remember something on Facebook where someone peeled a cucumber, sliced it lengthwise, scrapped out the seeds and then filled one side with lunch meat, greens, etc. and topped it off with the other side of the prepared cucumber and sort of an instant gluten-free sandwich. The moment had come for me to try this!

I prepared my cucumber and lay in a half leaf of Romaine, layered tuna salad with tomatoes on top of that with an extra touch of freshly ground black pepper. I ‘closed’ my ‘sandwich’. To stabilize the whole thing, I stuck in toothpicks every half inch or so and sliced between them. They were now easy to access at dinner and kept their good looks until dinner!

Gluten-Free, Believe It Or Not!

Sometimes, I look back on the ‘olden day’ and remember when a quick pasta dinner was . . . well, quick! Now, when the family gets a hankering for pasta and sauce for a Friday meatless meal, my current recipe begins with, “First, make the pasta.”! I usually end up making the sauce and preparing the vegetables for steaming before making the pasta.  That way, I can concentrate on the pasta without worrying about getting the rest of the meal ready. Although I have been known to whimper a bit, I really don’t mind doing it. Homemade pasta just tastes better. And, as I mentioned a few postings ago, companies have been kind to the ‘gluten-impaired’ and there are a lot of great gluten-free flour blends that make things almost back to normal.

This evening, my husband liked the idea of having a tomato/mushroom sauce over pasta. My daughter agreed only said to make it so she doesn’t bite into a mushroom. She likes the taste of mushrooms but isn’t crazy about the texture.

My favorite flour blend these days is Authentic Foods Steve’s Gluten-Free Flour Blend. BetterBatter Gluten-Free Flour Blend works well, too. All can be found on-line. Check the on-line Walmart store as they often have items you can find in their stores.

The recipe for homemade pasta? I’ve probably mentioned it before but just figure on about a half cup flour per person eating and then add one more cup to be sure! Add a good pinch of salt and the eggs. Now, eggs are definitely a variable in this so add them, one by one, and mix until it comes together and then knead. Roll out on a floured board (use either rice flour or the flour blend mix. Cut into strip about half an inch wide and as long as you want them to be! Spread them out on a parchment lined baking sheet and let sit for about 30 minutes until needed. Bring a big pot of water to an energetic simmer, add a tablespoon of olive oil and cook the pasta gently as you add it to keep them separated. It takes about four to six minutes depending on how thick you rolled them out. Drain and rinse with cool water. Serve with your sauce of choice.